When you want to print your artwork on fabric, one of the most important steps is file preparation. A well-prepared file ensures sharp details, accurate colors, and smooth printing. A poorly prepared file can result in blurry images, dull colors, or unexpected issues.
In this guide, we’ll explain how to prepare file for fabric printing step by step. You’ll learn about resolution, file formats, color settings, scaling, and common mistakes to avoid. For more details on our custom fabric printing services, check out our main page.
Table of Contents
1. Why Preparing Your File for Fabric Printing Matters
Fabric printing is very different from screen display. A design that looks perfect on your laptop or phone may not look the same on fabric. Printers need precise data—resolution, colors, and file size—to reproduce your design correctly.
By preparing your file properly, you:
Avoid pixelated or blurry prints
Get colors closer to your original design
Ensure smooth production without delays
Save time and money by preventing reprints
Learn more about how our printing process works to understand why file preparation is so important.
2. Choosing the Right File Format to Prepare Your Fabric Printing File
The first step in preparing your design is picking the correct format. Different formats work best for different needs.
AI (Adobe Illustrator):
Best for vector graphics, logos, and patterns
Can scale to any size without losing quality
Recommended for professional designers
PNG:
Supports transparent backgrounds
Works well for patterns, illustrations, and logos
Maintains high image quality
JPG:
Good for photos and complex images
Keep the compression low to avoid quality loss
Smaller file size, easier to upload
❌ Avoid GIF or BMP, as they are not suitable for fabric printing.
Check out our How It Works page for tips on submitting different file formats.
3. Understanding DPI When You Prepare Files for Fabric Printing
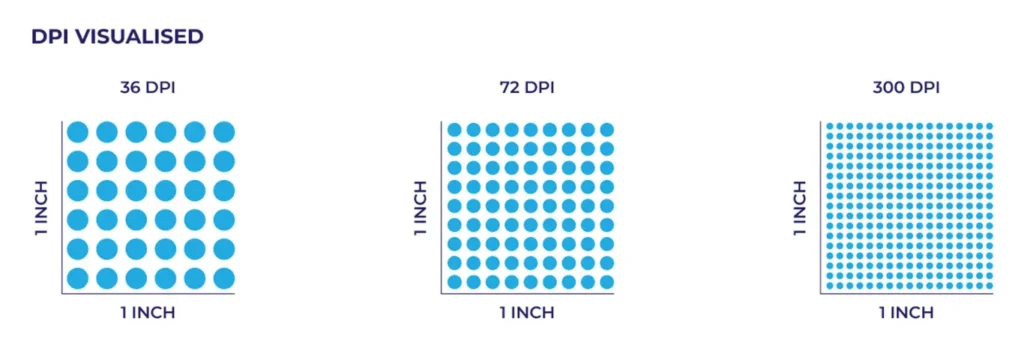
Resolution is critical in fabric printing. DPI (dots per inch) tells the printer how many dots of ink to place in one inch.
72 DPI → Web use only, too low for fabric
150 DPI → Minimum for large patterns or simple designs
300 DPI → Best for sharp details, text, and logos
Rule of thumb: If in doubt, always choose 300 DPI. A higher resolution ensures crisp results and avoids pixelation.
For more guidance on how DPI affects print quality, see our tutorial on fabric printing dpi.
4. Setting the Correct Resolution to Prepare Your Fabric Printing File
Even if your design looks good on screen, it may not be suitable for fabric printing without the right resolution.
In Photoshop:
Open file → Image → Image Size
Uncheck “Resample”
Set resolution to 150 or 300 pixels/inch
In Illustrator:
Create new document → Raster Effects → High (300 DPI)
Export PNG/JPG at 150–300 DPI
Save a copy in AI format for future edits
👉 Small detailed designs (like logos) need 300 DPI.
👉 Large repeating patterns can often use 150 DPI.
Always check your fabric printing dpi before uploading.
5. Choosing the Right Color Mode for Fabric Printing Files
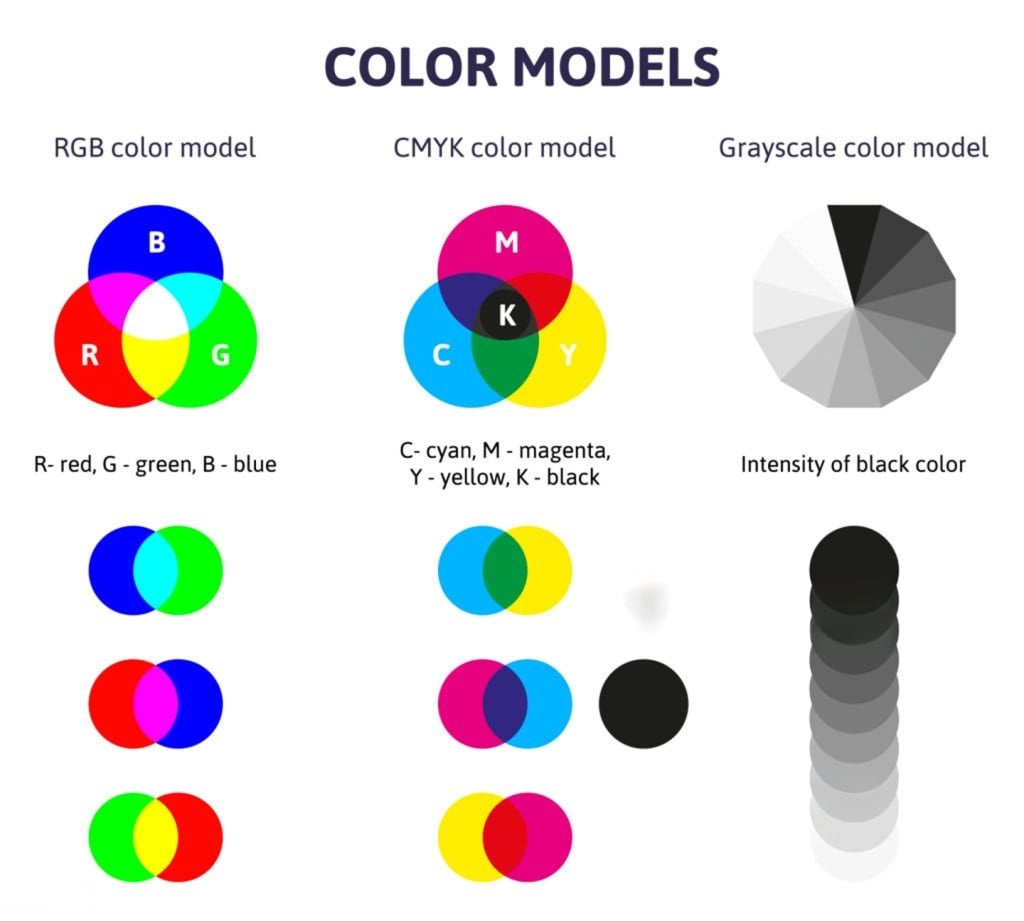
Colors on screen are displayed in RGB. Printers use CMYK inks. If you don’t convert your file, the colors may look different after printing.
RGB: For screens, very bright but not print-accurate
CMYK: For printing, ensures closer color accuracy
How to set CMYK mode:
Photoshop → Image → Mode → CMYK
Illustrator → File → Document Color Mode → CMYK
💡 Tip: If exact color matching is important, ask your printer for a fabric swatch book or consult our color guide.
6. File Size and Scaling
Your file must match the final fabric dimensions.
Always set the correct size at 150–300 DPI
Don’t enlarge small, low-resolution images—they will blur
Use vector formats (AI) for unlimited scaling
6.1 For repeating patterns:
Create a tile (e.g., 20 × 20 cm at 300 DPI)
Test the repeat in your design software
Export just the tile—printers will repeat it across the fabric
For very large designs, confirm with your printer whether they prefer one big file or multiple panels. See our custom fabric printing guide for more details.
7. Checklist Before Uploading Your Design
Before sending your file, go through this list:
✅ Resolution: 150–300 DPI at print size
✅ File format: AI, PNG, or high-quality JPG
✅ Color mode: CMYK
✅ Size matches fabric dimensions
✅ Fonts converted to outlines
✅ Repeating patterns tested
✅ Bleed added (2–5 mm if design touches edge)
✅ File name is clear (e.g.,
floral_pattern_300dpi.png)✅ Saved at maximum quality
Following this checklist will make your custom fabric printing experience smoother.
8. Common Mistakes to Avoid
Here are the errors we see most often:
❌ Using web images at 72 DPI
❌ Sending files in GIF/BMP format
❌ Forgetting to outline fonts
❌ Designing in RGB and skipping conversion
❌ Enlarging small files instead of starting with high-resolution
❌ No bleed for edge-to-edge designs
❌ Over-compressing JPGs
Avoid these mistakes, and your fabric prints will look professional. Check our How It Works page for more tips.
9. Conclusion & Call to Action
File preparation may seem like a technical detail, but it’s the foundation of high-quality fabric printing.
To recap:
Check your fabric printing dpi (150–300 DPI is ideal)
Save in the right format (AI, PNG, or JPG)
Use CMYK for accurate colors
Match file size to fabric size
Double-check with a pre-upload checklist
When you prepare file for fabric printing properly, you get sharp, vibrant, and professional-looking results every time.
👉 Ready to see your design come to life on fabric? Upload your file today on our custom fabric printing page and start your project with confidence!